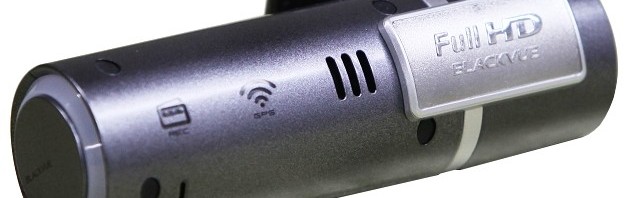
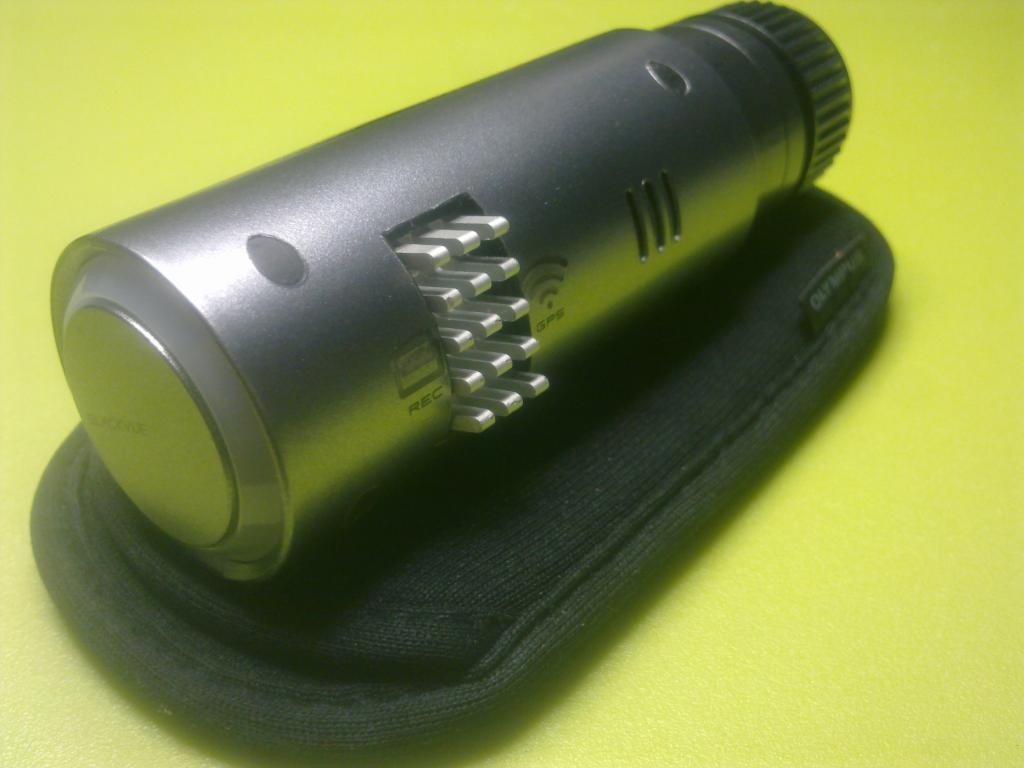
The BlackVue DR400G-HD is one of the most popular dash cams available today. This DVR is manufactured by Pittasoft, a Korean company. Unlike many of the other dash cams available, we haven’t seen any clones / fakes on sites like DealExtreme and AliExpress. This camera is based on the Texas Instruments TMS320DM368 Digital Media System-on-Chip. This dash cam is currently discontinued and has been replaced by the BlackVue DR400G-HD II.
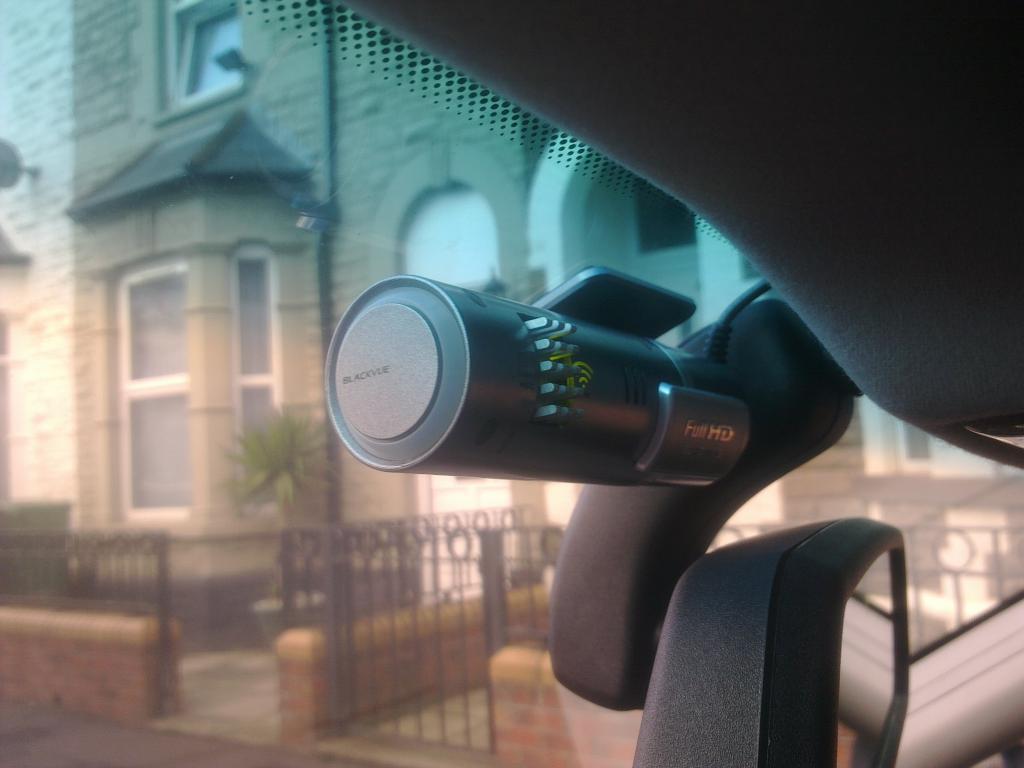
It can record HD video (1080p at 30FPS) and the picture quality is excellent in the day and good at night. It has a very small size which makes it unobtrusive when installed. It does not come with an LCD screen given its small size but once it is set up and installed, there is no need to move it around. The built-in GPS records the vehicle speed and status information, which can be synchronized with Google Map to display the driving path. This dash camera also has a G-sensor and parking mode. If you are using parking mode, you may want to consider a Battery Discharge Prevention Device.
Overall this is one of the best performing cameras available. However it appears to be plagued with reliability problems. Cameras that freeze, stop operating or have deteriorating picture quality have been reported frequently.
Known problems
Purple Light of Death
When the camera boots up, it becomes completely unresponsive. The LED button / ring glows purple and it gets stuck in this state. The camera will not record in this state.
To reboot, you must push the led reset button for 10 seconds. If the camera does not reboot properly, the camera is likely damaged.
One potential cause for this problem is excessive heat. Avoid using your camera in parking mode when it is hot outside.
Burned out Camera
Numerous cameras have burned out due to overheating. This typically happens when the camera is recording in parking mode and the car is parked outside with the temperature above 24 degrees C.
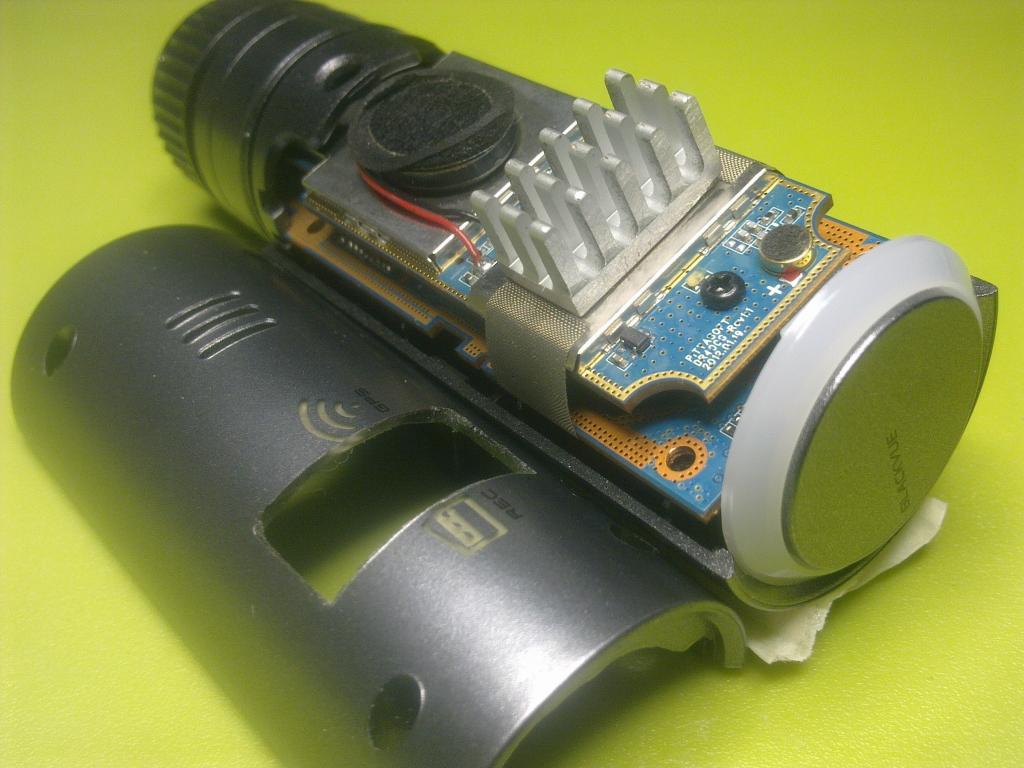
Some owners have drilled holes in the case to improve cooling, but this does not appear to be sufficient. Others have removed the rear half of the case and have installed a heatsink as shown in the following pictures. This is a more reliable solution.
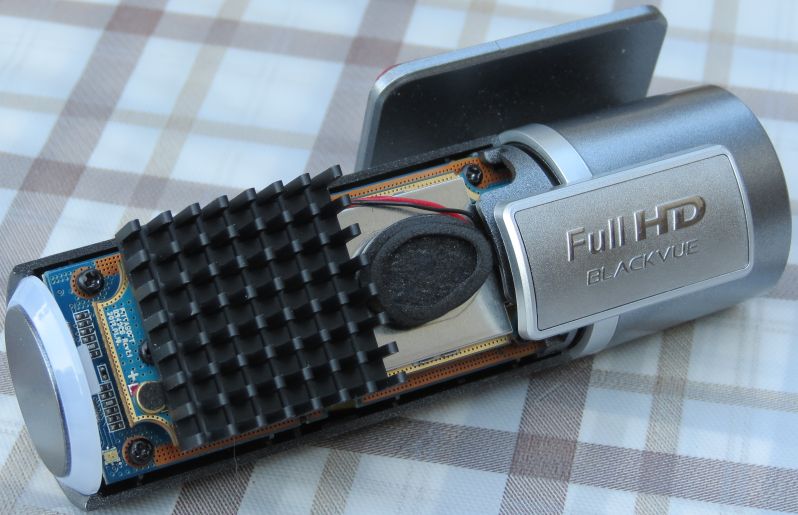
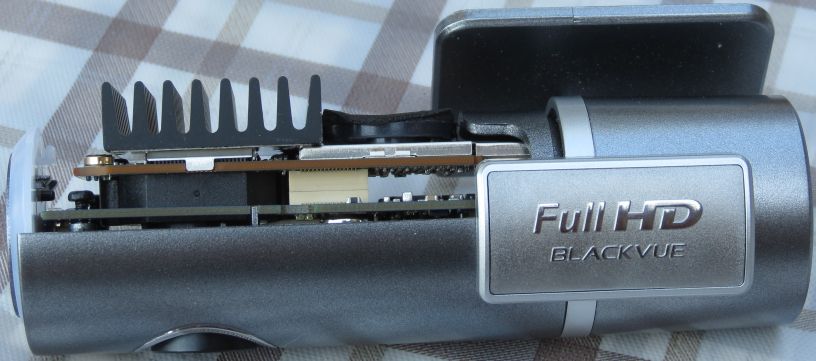
Another example:
“Please check SD card” error
Many people have received this SD card error. The unit is having trouble reading the SD card likely due to a corrupted file and cannot record as a result. Save whatever files, if any, you want to save & then reformat. Reformatting of the card should happen on a weekly basis.
The correct way to format the card is to use the official SD Formatter software AND choose “option” -> “format type” -> “full (overwrite) and Format Size Adjustment: Off
Deteriorating Picture Quality
Horizontal lines appear after parking in the heat for a while. The lines slowly disappear after a bit of driving though.
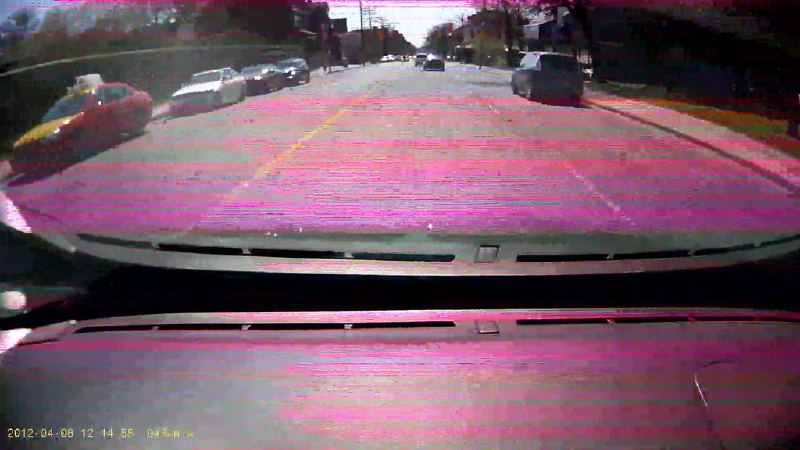
This is a known issue. Avoid parking the vehicle with the sun shining directly on the unit. The unit tends to run hot because of GPS. Problem will correct itself as unit cools down.
Foggy Lens Problem
Some owners have complained of a foggy lens with this camera. The following video shows how to fix this problem.
Timestamp problem
With firmware v1.039E, the time jumps 1 hour ahead. Time stamp issue typically occurs when power is disconnected and reconnected in a short period of time (i.e. a few minutes). The solution is to update the firmware to v1.040E.
Speaks Korean not English
If your camera has the Korean firmware and you would like the English firmware, there are 2 possible ways to correct this.
Option 1
- Uninstall existing BlackVue software on your PC.
- Reformat SD, download firmware v1.037E (English). Even if you have the Korean v1.038, you can roll back with this.
- Run update on camera
- Reformat SD, download firmware v1.038E (English).
- Run update again and you’re done!
Option 2
- Go to Config file on microSD
- Open Version file with notepad
- Change the Korean to English. The updated version should look like this:
version = 1.038
model = 400
language = English
[software]
version = 1.038
model = 400
language = English
[config]
version = 1.000
model = 400
4. Save the file. The unit should now speak English.
Hardwiring the camera
There are a few methods to hardwire your camera. Below are three popular methods, but this tutorial will only cover the last method (fusebox).
- Hardwire directly to the car battery (This involves more work as you would have to feed the wire from from the passenger compartment through the firewall hole and into the engine bay)
- Tap into your Dome light or cigarette lighter wires (This is the quickest method, but it involves cutting into existing wires. For those going this route, you can use a T-tap connector if you don’t want to solder)
- Tap into your Fusebox (Least intrusive)
Tools Needed:
- Phillips Screwdriver
- Multimeter
- Crimping & Wire stripping Tool
- Soldering Iron (OPTIONAL – only required if your barrel connector needs to be wired)
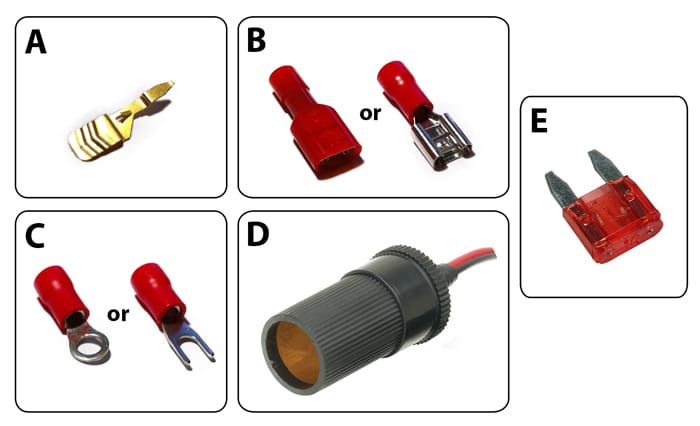
Parts you will need to buy (Total Cost between $3-$7, more if you buy items in bulk):
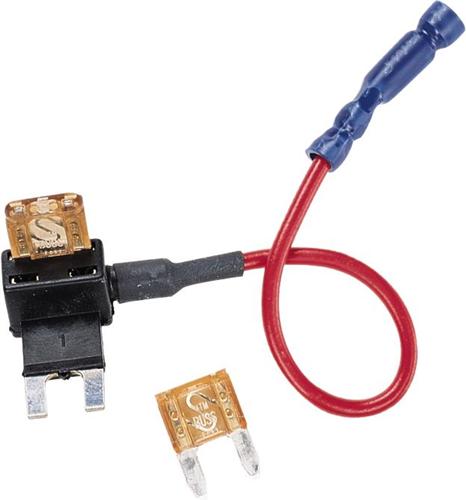
A. 1 x ATM fuse tap ~$1
- These can be bought from eBay
- Alternatively, you can buy a Dual Fuse Tap from various auto stores (~$15). They usually come in a kit with a variety of fuses.
- Make sure that your car uses ATM blade fuses, if not, you may need to buy a compatible fuse tap
B. 1 x Female disconnect terminal ~$1
- If you purchased the fuse tap above from the ebay link, a compatible terminal is included already.
C. 1 x Ring or Spade terminal ~$1
- These are to connect your negative (black) wire to the grounding screw next to your fusebox. You will need to check the size of the screw in your car to get a compatible terminal.
D. 1 x Cigarette lighter barrel connector (OPTIONAL) ~$2.50
- If you plan on cutting into the power cable that came with the Blackvue camera, then you don’t need this.
- If you buy one of these without wires, you may have to solder on your own wires to it.
- If you can find a cheap extension cable with a barrel connector on one end, you don’t need to solder anything.
E. 1 x 10A or less ATM blade fuse (OPTIONAL) ~$1
- You only need this if you plan on using an empty slot in your fusebox, otherwise you can tap into one of the existing fuses.
STEP 1 – Wiring the cigarette lighter barrel connector
If you’re cutting directly into the power cable that came with the Blackvue camera, skip to STEP 2
To wire the barrel connector (D), twist open the cap to reveal the copper contacts behind it. Find an extra 1-2 ft cable and solder the one end to this connector. Solder the red wire (Positive) onto the copper tab in the centre, and the black wire (Negative) to the side tab. Follow the diagram below.
STEP 2 – Crimping the terminals
Take the other end of the cable, and make a clean cut. If you’re using the existing power cable that came with camera, make sure the cable is long enough to run from behind your rear view mirror to the fuse box before cutting it!
Remove about half an inch of the wire’s insulation with your wire stripper.
Use the crimping tool to attach the Female Disconnect Terminal (B) to the Positive (Red) wire, and the Ring or Spade Terminal (C) to the Negative (Black) wire. If you don’t have colour coded cables (like me :P) use your multimeter to check. The end result should look like this:
STEP 3 – Locating a grounding screw, fuse terminal and the load side
This is the part where the multimeter becomes extremely handy.
Locate the Fusebox (Usually directly underneath the steering wheel). There should also be a screw near it where you can attach the negative ground wire (Black) to.
If you can, try to find a pdf maintenance manual online for your car. It will tell you where the Fusebox is located, how to get to it, and also map out the purpose of each fuse in the relay. Usually the panel covering the fusebox will also have a diagram printed on it.
This is what mine looks like, with the grounding screw highlighted in Red:

Take out your multimeter, set it to “DC” and connect the Black probe to the grounding screw. Then use the Red probe to test each terminal. Notice that there are two tiny metal contacts on each coloured fuse. Place the Red probe on one of them to test for a voltage reading.
If you need the Blackvue to turn on and record only when the car is running, you need to probe the terminals for a voltage reading while the car key is in the ACC position. Otherwise, do the test with everything off.
A live terminal should be one that gives you a little over 12V+ when you probe it.
If you happen to find an empty terminal that gives you a reading, you can go ahead and use that with your ATM blade fuse (E), otherwise, you will need to use one of the terminals that has an existing fuse (10A or less only!).
Your fuse tap (A) will slot into the terminal with the fuse like this:
Now, before you continue, you need to determine which blade the fuse tap goes onto. The one blade goes into the LOAD side, while the other goes into the POWER side. The fuse tap needs to go with the blade into the LOAD side.
Remove the fuse from the terminal you intend to use, and then, with the Black probe of the multimeter still connected to the grounding screw, use the Red probe to test each slot. The slot that gives you a 12V+ reading is the POWER side, therefore the fuse tap goes into the other slot.
STEP 4 – Putting everything together
If you haven’t already, insert the Fuse tap (A) along with the fuse as described in the previous step. Attach the Female disconnect terminal (B) to the tab of the fuse tap sticking out. Use the screwdriver to secure the Ring or Spade terminal (C) to the grounding screw.
Once you’re done, it should look like this:
Tidy up the cables, hook up the BlackVue and you should be good to go!
Maintaining your microSD card.
NOTE: It is not recommended to remove the SD card while the LED lights are turned on.
Re-inserting the SD card into the camera
Remove the SD card 10 sec. after turning off your engine.
After insert the SD card to the main body, engine on.
In case you installed a battery discharge prevention device to your car, please take off the power jack from the main body.
Sample Videos
Day Comparison Video – Itronics ITB-100HD (bottom right) vs BlackVue DR400G-HD (bottom left) vs FineVU CR-500HD (top left)
Night Comparison Video – Itronics ITB-100HD (top right) vs BlackVue DR400G-HD (bottom left) vs FineVU CR-500HD (top left)
Should I Purchase?
When people initially reviewed this camera, feedback was excellent. The great video quality, small size and somewhat reasonable price make it an attractive dash cam. However the reliability problems with this camera are so common that we cannot recommend it.
Firmware
WARNING! MAKING CHANGES TO YOUR FIRMWARE ARE PERFORMED AT YOUR OWN RISK. WE ARE NOT RESPONSIBLE FOR ANY DAMAGE TO YOUR DASH CAM AS A RESULT OF THESE INSTRUCTIONS.
Firmware Update Instructions
- You must use an SD-Card reader to perform this operation. Do not attempt to do this directly on the dash cam.
- Insert the micro SD card into your PC.
- Download the desired firmware from the section below.
- Double click the firmware upgrade file. Follow the onscreen instructions.
- Insert the microSD card with the newly downloaded firmware into your BlackVue. Please make sure it is turned off.
- Turn on the Blackvue. The firmware will automatically update. Please ensure there is a constant power supply during the upgrade.
- Use your dash cam with the latest firmware.
Latest Firmware
The latest firmware is version 1.040E. Click the following link for the latest firmware version. V1.040E
Previous Firmware
Click the appropriate link to download any of the previous firmware files.
Downgrading the Firmware
To downgrade from v1.039e to v1.037e
- Connect MicroSD card to PC,then format it quickly.
- Choose the english firmware v1.037e,double click install to MicroSD card.
- After finished install new firmware to MicroSD card, DON NOT take out the SD card from PC, go to MicroSD card, open “\BlackVue\Config” folder, open the “Version” file with Notepad. Change 2 line “language = English” to “language = Korea”, AND CHANGE [firmware] “version = 1.037” to “version = 1.039”, then save the file. The file should look like below:
version = 1.037 —————–> version = 1.039
model = 400
language = English —————–> Korea
[software]
version = 1.038
model = 400
language = English —————–> Korea
[config]
version = 1.000
model = 400
4. Now move MicroSD card out of PC, insert into BlackVue and power on, first you will hear English, after upgrade done, it restart again,the Blackvue start to record video, but you will hear korean again, don’t worry, shut down the power, move out the MicroSD, connect ot PC,open MicroSD card “\BlackVue\Config” folder,open the “Version” file with Notepad. And you will find [firmware] “version = 1.038” it changed back by itself, just change 2 line “language = Korea” to “language = English”,then saved the file. It show like below:
version = 1.037
model = 400
language = Korea —————–> language = English
[software]
version = 1.038
model = 400
language = Korea —————–> language = English
[config]
version = 1.000
model = 400
5. If you want to set up the option of blackvue, you can use MicroSD card “\BlackVue\Application\BlackVue.exe” software or the software in PC to do it and save.
6. Finally move out the MicroSD card out of PC, insert into BlackVue and power on, from now you will hear English again.
User Manual
Specifications
Data Sheet No specs match that search. Hardware LayoutTechnical Specs
Spec BlackVue DR400G-HD Brand BlackVue Model DR400G-HD Channels 1 Channel Setup Front Form Factor Cylindrical Release Date Dec 2011 Country Korea Warranty 12 months Spec BlackVue DR400G-HD Processor Texas Instruments TMS320DM368 Video Format MP4 Compression H.264 Screen Size No Touchscreen No Mount Adhesive Power Supply 12V Battery Type 170mAh Spec BlackVue DR400G-HD Parking Mode Buffered Wi-Fi No GPS Yes Apps Windows, macOS Cloud Connectivity No Voice Commands No Spec BlackVue DR400G-HD SD Card Type MicroSD Max Card Size 32GB Operating Temperature -20°C to 60°C Swivel No Error Notification LED Camera Units
CMOS Unknown Max Resolution 1920 x 1080p FPS 30 Bitrate 10.0 Mbps Viewing Angle 120° Dimensions 102 x 32 HDR No
Published: July 25, 2012