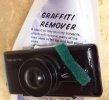
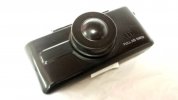
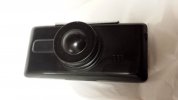
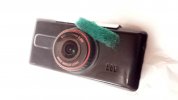
How to Remove Printing ( Logo ) from dashcamera body / shell.

niko

Well-Known Member
Retailer
Joined
May 1, 2013
Messages
10,668
Reaction score
6,561
Location
Dublin
Country
Ireland
Dash Cam
Street Guardian UK / EU / EEA Distributor
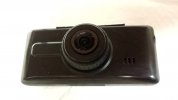
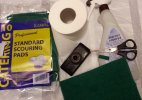
Almost all dashcameras has some kind of printing on the front of the unit ( model, brand name, etc ), but all this makes dashcamera more visible from outside. To make it more discrete, - need to remove logo. Easiest way is just to use black electrical tape, or just cover with permanent market, but for proper job and nice look best is to remove this printing. For that you need some "soft" solvent like Goof Off or Goo Gone, but its hard to find them in many countries.

NB! Do not use paint thinner, nail polisher remover or any other hard solvents. They are too strong and will remove top coating of dashcam paint ( I learned it hard way ).

I tried Graffiti Remover and it worked perfectly.

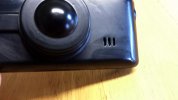
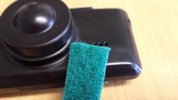
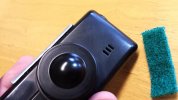
If your dashcam has slightly black matt coating, then place where you removing logo or other printing, will be slightly shiny ( this is normal ), but I have used scoring pad to bring matt back.

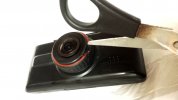
For hard to access places, ( like lens surrounding ring on Panorama 2 ), need first to add few drops of Graffity Remover to the paint, leave it for 10 sec to soften the paint and then scrape away with knife or scissors.

During whole process use time to time paper tissue ( I used toilet paper ) to wipe off excessive liquid, so it will not stay too long on surrounding plastic parts.

Whole process will take about 10 minutes.
How to remove Logo (1).jpg


How to remove Logo (2).jpg


How to remove Logo (3).jpg


How to remove Logo (4).jpg


How to remove Logo (5).jpg


How to remove Logo (6).jpg


How to remove Logo (7).jpg


How to remove Logo (8).jpg


How to remove Logo (9).jpg


How to remove Logo (10).jpg
 
Last edited:
I used nitro dilution and it worked as well. But you need to be very careful that you don't damage the plastic.
 
Looks good Niko. This is something I should do, but once they're in the car I'm reluctant to move it.
 
You can also paint over the writing with a dark special marker, much cheap, quicker and easier :)
 
You can also paint over the writing with a dark special marker, much cheap, quicker and easier :)

Although it is cheaper, quicker and easier, this technique tends not to hold up well or be advisable in the long term. Even "permanent" markers fade and color shift in this application.
 
You can also paint over the writing with a dark special marker, much cheap, quicker and easier :)

I guess you didnt read what I wrote :p

Easiest way is ..... just cover with permanent market,

P.S. - market was one of the first things I started using 3 years ago to cover any logos / writings on dashcams, but it actually not proper job. Many printings are thick and logo letters still can be seen under sun reflection due to un-even surface. So the proper job is just to remove them ;)
 
Although it is cheaper, quicker and easier, this technique tends not to hold up well or be advisable in the long term. Even "permanent" markers fade and color shift in this application.

Hehee, you almost read my mind. Just tried to explain same about colour shift, especially on un-even surfaces , but my english still need to polish up;)
 
I guess you didnt read what I wrote :p


P.S. - market was one of the first things I started using 3 years ago to cover any logos / writings on dashcams, but it actually not proper job. Many printings are thick and logo letters still can be seen under sun reflection due to un-even surface. So the proper job is just to remove them ;)

Yes I saw that but to be honest, your effort looks like it scratched the camera instead of cleaning the writing off cleanly.

Maybe I should have said "paint it off" using black paint ;-)
 
Yes I saw that but to be honest, your effort looks like it scratched the camera instead of cleaning the writing off cleanly.

Maybe I should have said "paint it off" using black paint ;-)

Not scratched at all, but made it dull, - removed glare etc. Pictures are zoomed in and later on I polished with cloth and no scratches even if zoomed.

Paint ? , - this is no easy way. I am "married" to dashcams for over 3 years. Had nearly 100 pcs and many of them painted over, but thats much harder and more time consuming than what I recommend here. For proper paint over first of all still need to remove all logoes / writings to have nice even surface ( if you want to have nice looking final product ), then need to disassemble shell, "sand" it, paint primer coating, then main paint coating, always take time between coats etc. Thats not practical way at all unless you got white shell dashcams and want to have it black.
Also tried plasti-dip. At first it was favourite "tool" for me, but plastidip for longh term is also no good, - it peels off by the time.

Believe me, I went through many test'n'tries and for myself I know whats best, - thats why I am sharing my experience, which I find more practical for me. ( maybe my expectations and standards are too high ? ). But of course other people can chose whats best for them ;)
 
I see what you mean, I was thinking of a more permanent solution if you didn't have to sell the camera again and the marker solution was not strong enough, so I may use a kit paint used for coloring 1:18 models and such.
 
I see what you mean, I was thinking of a more permanent solution if you didn't have to sell the camera again and the marker solution was not strong enough, so I may use a kit paint used for coloring 1:18 models and such.

@ kit paint, - thats what I am also would try if I get hands on it ;)
 
Oh I didn't know about the like feature :)

Do you have an updated photo of the camera that you worked on since you said it left no scratches.

I might end up doing this :)
 
Oh I didn't know about the like feature :)

Do you have an updated photo of the camera that you worked on since you said it left no scratches.

I might end up doing this :)

When get chance, I will make photos.

Actually if I would do it again, -I would use much finer scouring pad or dish-washing pad, - then there will not be scratches left. It's just when I found Graffiti remover, the only "scrubbing thing" I had "within hand-reach" was that scouring pad, so I used it :)
 
The scourers come in finer grades for commercial use, smash repairers use them in the paint shop for vehicle prep
 
When get chance, I will make photos.

Actually if I would do it again, -I would use much finer scouring pad or dish-washing pad, - then there will not be scratches left. It's just when I found Graffiti remover, the only "scrubbing thing" I had "within hand-reach" was that scouring pad, so I used it :)

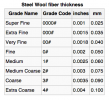
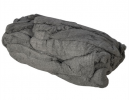
The thing to use is grade #0000 steel wool. This will give you a perfectly smooth finish. See

If you really want to go nuts about achieving a "super smooth" finish use "Tripoli" pumice powder. There a various forms of pumice to use since you don't really want to make it glossy again.
(I learned this from a friend who restores outrageously expensive antique furniture for a living.)

wool.png

swool.png
 
Last edited:
@niko, you have done a good job to show how the black color is important for dashcam people.

As you know, to the best present the design, the C1 has 4 colors, black, silver, gold, blue, black is always the popular one.

Below is my experience on logo printing.

The company always want to the logo is firm enough, they never image you need to erase it. All printing need to pass 3M Tape test and scratches tests.

3M tape test, covering the printing by 3M tape, press it to solid attached, quick peel the tape off to see if any leavings on tape, if has, printing failed test

Scratches test, scratching grids on printing area and cover it by 3m tape, then peel off it to see if leavings on tape.

Scratch test is far strict than 3M test, the print oil should be special made.


The thing to use is grade #0000 steel wool. This will give you a perfectly smooth finish. See

If you really want to go nuts about achieving a "super smooth" finish use "Tripoli" pumice powder. There a various forms of pumice to use since you don't really want to make it glossy again.
(I learned this from a friend who restores outrageously expensive antique furniture for a living.)

View attachment 5378

View attachment 5379


Wire wool is messy stuff as it produces lots of wire fragments and metal dust. I much prefer products like Webrax, which essentially is a scouring pad with abrasive bonded into the fibres. http://www.axminster.co.uk/hermes-webrax-hand-pad My father switched from 0000 wire wool to pads years ago when he was still wood turning.

I've often used a burnishing cream (intended for finishing a 2 part plastic coating - Rustins I think) to polish out the scratches in watch glasses (both plastic and mineral glass), that could also be a good product for this.
 
Back
Top