Ok Fixed, tested works great.
Replaced Mini USB B port (5 pin, 9.2mm long). Hard to completely disassemble the camera to replace it. Total tear-down, remove case, remove heatshink, Lens assy and flex, rear LCD and flex and main PCB (as well as MIC and beeper etc). Life big caps out the way to remove the heatsink and main PCB.
Had to use chipquik to de-solderer the USB port ...its the only way. But ensure you use plenety of flux and melt in some std 60/40 (or I use 63/37 spolder) to the old joins and the non lead solder just won't flow otherwise.
Once alloyed with std solder, do the same with chipquik but "Blob" this across all the rear 5 pins and 4 side pads....preferably with 2 irons as the GND plane sinks heat away. But i used small irons and tips so it was a pain. Finally it came out.
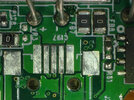
You must then clean the old chipquik and solder off..alll of it. I use solder wick dipped in flux.....does the job...see images. Tacked down on corner pad ensured pin pads were aligned..ok...did another corner then drage flow soldered the rear pins all at once...perfect...took 4 goes at that though. Then re-soldered the corners
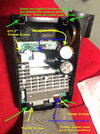
Now there are 3 internal screws slightly thinner that go thru the alloy heatsink. These look the same as the other screws, they are no they are slightly thinner...do not mix them up. There are 4 outer case screws slightly thicker....and one that goes internal near the beeper. You need to remove the heatsink, beeper, mic, flexes, screws just to get the PCB out.
Clean it all up after soldering ...i'm old skool using rosin flux and 63/37 leaded solder, i hate non lead (metal glue) with a passion.. Clean case interior, displays and plastic screens...took me 2 goes to ensure interior screen was cleaned of dust. The rest is easy, move the marge capacitors ...there are lots of tape holding flex down...be careful with these. They also glued the bottom flex to the FPC holder.
The USB port was a std female 5 pin 9.2mm USB B mini port.
like this one. Powered up works fine....except i have effed up the SD card with tape and pressure its difficult to insert and remove...i have to "disassemble again to fix this" so take note of how it was before taking apart....i didn't...sigh for an experienced tech...that's a "Fail".if not
Oh i taped protection over the displays and screens (before fixing) with Mylar tape....one scratch is too many! Can an amateur do this?? Yes if they are good at soldering and using chipquik and have 2 medium or small irons......but ...mostly no....most will wreck it. Its not a hard...its position is hard to get at and the port wouldn't budge. I had to use higher2 wattage "small irons" as my smallest just wouldn't do the job ( i have dozens or irons and tips) .....experience and poor solder flow ...i knew straight away "more heat Igor"!.
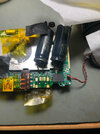
Pics USB removed pads cleaned: Then flux applied, then assembled showing screws


